Color Grade panel
The Color Grade panel is the second tab on the right side of the Color tab. It's where you'll spend most of your time — running matches, fine-tuning the AI's settings, and stepping the same look across the rest of the timeline.
Match and Match All
The two big buttons at the bottom of the panel are Match and Match All.
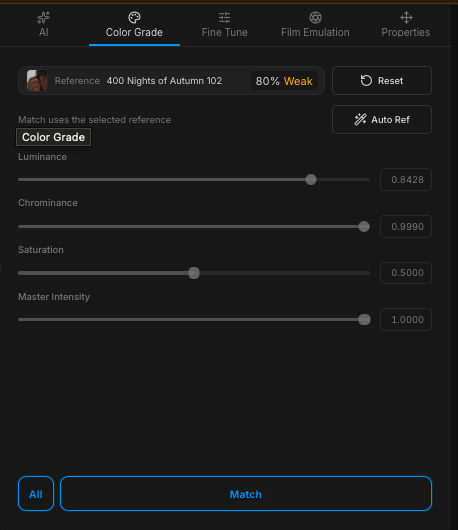
- Match runs a match between the currently-selected reference and the current clip. You need one reference selected for it to run — with no reference selected, the Match button is inactive. It's the same action as pressing A on the keyboard or double-clicking a reference in the left panel. Whatever reference is currently selected is the one Colourlab Ai 4 uses.
- Match All sweeps a match across the timeline, using the selected reference to match every clip. If you select multiple clips on the timeline, the All on/off toggle limits Match All to just those selected clips instead of the whole timeline. See Auto-reference below for the workflow that makes Match All transformative.
The sliders
When a match runs, three sliders snap to values chosen by the AI engine. Those values are a strong starting point; the sliders are there for you to fine-tune from.
Luminance
The Luminance slider controls how much of the reference's luminance is applied on top of the source.
- 0 — the source's own luminance, unchanged.
- 1 — the reference's luminance, fully applied.
Anywhere in between is a blend. This is the slider you reach for when the match feels too bright or too dim relative to the source.
Chrominance
Chrominance is the equivalent slider for color, with luminance held out of it.
- 0 (far left) — the source's original chroma.
- 1 (far right) — the reference's chroma.
Use it to dial how strongly the reference's color cast carries into the clip, independent of brightness.
Saturation
The Saturation slider matches saturation between source and reference. It's the saturation match contribution — not the overall saturation of the image.
- 0 — the source's original saturation.
- 1 — the reference's saturation applied.
Master Intensity
Below the three sliders is Master Intensity, which fine-tunes the intensity of the look as a whole. Where Luminance, Chrominance, and Saturation can be controlled independently, Master Intensity balances all three together — so you can dial the entire look up or down in one move. Use it when the match is in the right direction but the overall feel is too strong or too weak.
The reference used for this clip
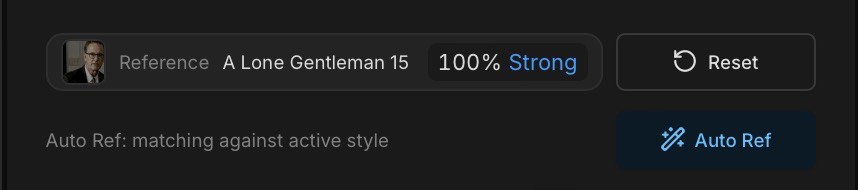
Above the sliders, Colourlab Ai 4 shows you the reference that was used to match the current clip, along with the name of the reference and a similarity score — how closely the content of the reference matches the source clip. It's pinned to the clip — when you move from clip to clip along the timeline, the panel updates to show whichever reference each clip was matched against.

This is one of the most useful bits of context in the application:
- Click the reference thumbnail to open the actual reference image, so you can see exactly what was applied.
- It's the fastest way to spot which clips share a reference, and which references are doing the most work in your project.
Reset
A Reset button lets you undo the match on the current clip and return to the source. The keyboard shortcut is R — useful when you're previewing matches quickly and want to bail back to source without reaching for the mouse. You can also right-click the clip on the timeline and choose Reset.
Auto-reference
Below the sliders is one of the most powerful features in the application: Auto-reference.
Activating Auto-reference requires styles you've already built or loaded — they're what the feature grades against. With a style in place, Auto-reference lets you nominate a bin of references as the candidate pool — and then asks the AI to pick the best reference per clip automatically, based on set of rules. The model analyses both the clip and styles, then picks the strongest pairing.
The workflow this enables:
- Build a selection of Style References that represent the looks you want for the project (your "color bible").
- Select auto-reference.
- Press Match or Match All.
Every clip on the timeline is matched — not all to the same reference, but each one to the reference from the bin that best suits it. It's the difference between manually matching each clip and letting the agent do the routing for you, and it accelerates a typical session enormously.
Clips that are matched by agent appear with a blue dot. Clips that are matched by you manually appear with a yellow dot, and clips that have been skipped because no match reference was found will appear with a red dot.
See Matching (coming soon) and Look Building (coming soon) for deeper coverage.