Clips
A clip is your source media — the actual video file you're going to grade. The word "clip" rather than "shot" is deliberate: in a future release, Colourlab Ai 4 will let you import a whole video file and have it automatically cut into shots, with each shot landing as its own clip in the project. Until then, a clip is whatever file you bring in, one at a time or in batches.
The Clips tab mirrors the References tab almost feature for feature — same bin layout, same Sort dropdown, same anchor mechanics, same right-click menu. The differences live in the import flow and in the depth of analysis, and they're flagged below.
Importing clips
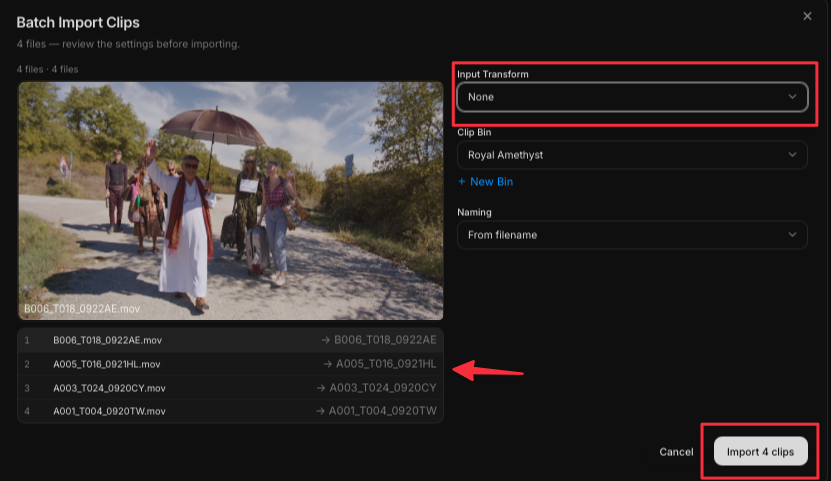
Two ways to bring clips into a project:
- Import Clip — bring in a single video file.
- Batch Import Clips — select multiple files and bring them in together.
When you import, Colourlab Ai 4 opens a dialog asking you to choose the Input Transform (iNode) for the source. If your footage is log-encoded — and most camera native files are — this is where you tell the system what color space the source is in so it can be converted into the working color space. With a batch import you can preview each clip individually and pick the right input transform per clip, which matters when you're mixing footage from cameras with different gamma curves.
See iNode (coming soon) for the full picture on input transforms.
Every imported clip goes through PIA Engine analysis — but unlike references, clip analysis runs entirely on-device. It doesn't touch the cloud, and no credits are spent. The analysis is also faster, because Colourlab Ai 4 isn't computing the deep cinematography palette that references get. This is why you can batch-import a thousand clips from a shoot without worrying about your credit balance.
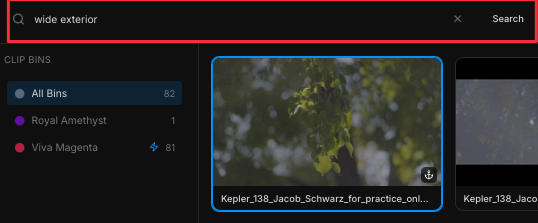
Search
The Clips tab has the same Search field as the References tab, but the on-device analysis indexes a narrower set of attributes. You can search clips by their content — for example:
- Shot type — interior or exterior.
- Time of day — when the shot was captured (read visually, not from metadata).
- Camera angle — close-up, wide, and so on.
Sort
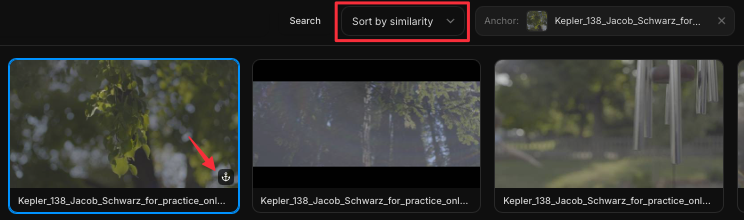
The Sort dropdown is identical to the one in References. Alongside the standard A–Z, Z–A, and oldest-to-newest options, the PIA Engine offers three perceptual sort modes:
- Sort by similarity — group clips by overall visual similarity.
- Sort by color — group by color content, ignoring exposure.
- Sort by exposure — group by exposure, ignoring color.
All three of those perceptual modes require an anchor.
Anchors
Setting an anchor on a clip works exactly the same way as it does on a reference. Right-click the clip and choose Set as anchor, and from that moment any of the perceptual sort modes will arrange the rest of the clips relative to that one.
Because anchors aren't tied to a specific tab, a clip can serve as the anchor for the References view and vice versa. That cross-referencing — a clip from the shoot becoming the yardstick for picking the right inspiration image — is one of the most useful workflows in the application.
See Anchors (coming soon) for the cross-tab anchor workflow in detail.
Bins
Clips live in bins just like references do. To add clips to a bin, drag and drop them. To create a new bin, click New Bin at the bottom of the bin list. Colourlab Ai 4 names new bins automatically; rename them whenever you like.
See Bins (coming soon).
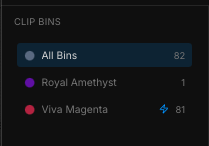
Power bins
Any clip bin can be converted into a power bin by selecting it and clicking the Power button. Once it's a power bin, the clips inside become available across every project belonging to the current user — useful for signature plates, reusable test footage, or anything you reach for repeatedly.
See Power Bins (coming soon).

Right-clicking a clip
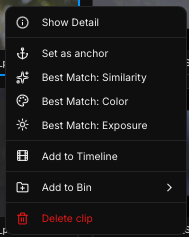
Right-click any clip for these actions:
- Add to Bin — drop the clip into a bin you choose.
- Add to Timeline — push the clip onto the active timeline.
- Set as anchor — make this clip the anchor for the perceptual sort modes.
- Best match similarity — set the clip as the anchor and sort everything else by similarity to it.
- Best match color — set as anchor and sort by color.
- Best match exposure — set as anchor and sort by exposure.
- Show Detail — open the PIA Engine readout for the clip (see below).
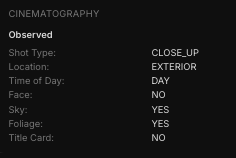
Show Detail — PIA Engine readout for a clip
Right-click a clip and choose Show Detail to open Colourlab Ai 4's analytical view of the image. For clips, the readout includes the same on-device PIA sections as the References Detail view — only the cloud-processed cinematography palette is left out, because clip analysis stays on-device.
The sections you see for a clip are:
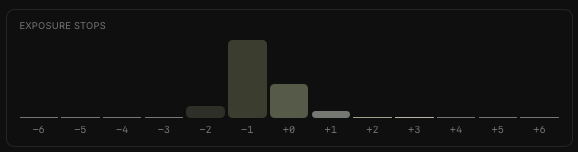
Stops of exposure
A true linear scene-value stop chart. For each stop you see:
- The dominant color in that stop.
- The number of pixels falling into that stop.
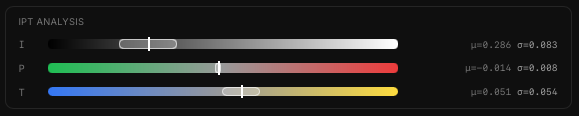
IPT analysis
IPT is a perceptually-accurate color space designed to match how human eyes see color. The three channels are:
- I — overall luminance of the image.
- P and T — color channels that correspond to the frequencies of light the eye actually samples.
Statistical values are shown for each channel. These numbers are more useful to the perceptual image-matching engine than they are directly readable to humans — they're the language the engine uses to compare images.
Saturation analysis
- Gamut volume — the percentage of the Rec. 709 gamut the image actually fills.
- Peak saturation — the maximum saturation of a single color in the image.
- Color temperature — the calculated temperature of the image.

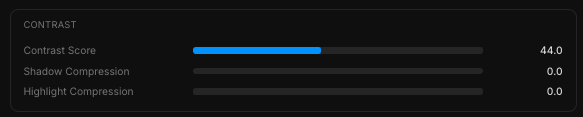
Contrast analysis
- Contrast score — a single number between 0 and 100.
- Shadow compression and Highlight compression — describing the S-curve roll-off in shadows and highlights, one of the most characteristic aspects of an image's contrast signature.
Color palette
The dominant colors of the image, calculated perceptually and weighted in proportion to how much of the frame each color actually occupies.

No cinematography palette for clips. The deep, cloud-processed cinematography analysis you see on references isn't part of clip analysis. Clip analysis stays on-device.
See PIA Engine (coming soon) for the technical innards.