References
The References tab is where every creative process in Colourlab Ai 4 starts. It's the centre of your creativity — the choice of reference ultimately decides what your material is going to look like, so we've made this tab a dedicated space for finding the right inspiration as quickly as possible.
The Global toggle
In the top-left corner of the References tab you'll see a Global button. With Global on (the default), you have access to every reference that has ever been loaded onto this computer — no filter by user, no filter by project, just the full library. It's the right place to start a broad search; as you narrow in on what you want, you can switch Global off to work inside a single project or bin.
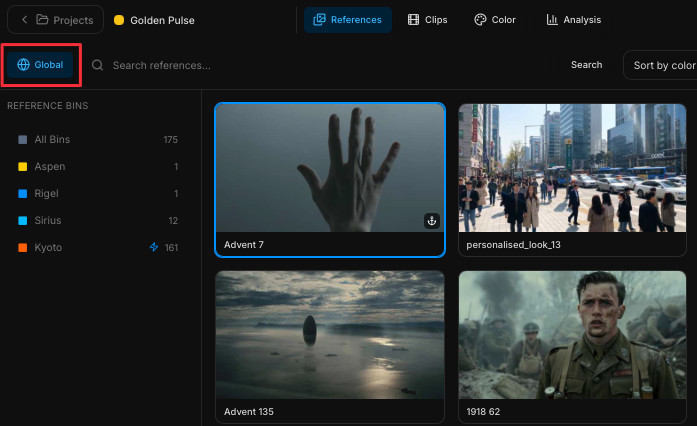
Search
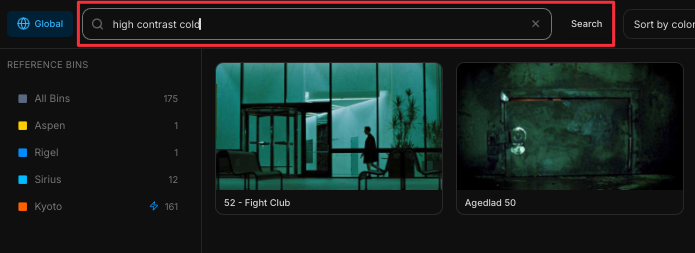
Next to the Global button is the Search References field. This is the most powerful way to find a reference: search by content, intent, shot type, temperature, saturation, or any combination of those. Try things like:
- interior warm shot
- close-up woman, cold, high contrast
- exterior late afternoon, hazy
Colourlab Ai 4 sifts through thousands of references in milliseconds and surfaces the ones that match what you described.
Sort
Beside the search field is the Sort dropdown. Alongside the standard A–Z, Z–A, and oldest-to-newest options you'd expect, the PIA Engine adds three perceptual sort modes:
- Sort by similarity — group references by overall visual similarity.
- Sort by color — group by color content, ignoring exposure.
- Sort by exposure — group by exposure, ignoring color.
All three of those perceptual modes require an anchor.
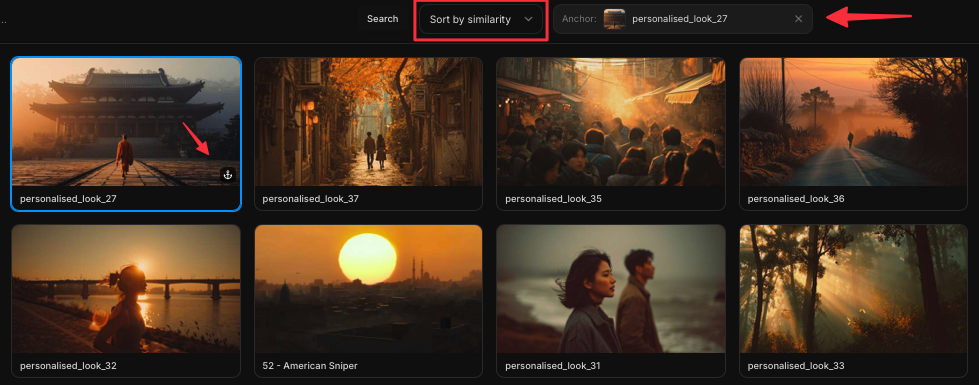
Anchors
An anchor is the image you nominate as the visual yardstick — the reference point Colourlab Ai 4 compares everything else against. Only one anchor is active at a time.
Setting an anchor
Right-click any reference and choose Set as anchor. Once it's set:
- The currently-anchored image appears in the top toolbar.
- A small marker shows up on the anchored image inside the library.
Sorting around an anchor
With an anchor set, pick one of the perceptual sort modes from the Sort dropdown:
- Sort by similarity — see references that look closest to the anchor overall.
- Sort by color — see references with similar color, regardless of exposure.
- Sort by exposure — see references with similar exposure, regardless of color.
This is how you narrow in once you've found a reference that's almost right. The color and exposure modes are especially powerful when combined: sort by color to find images with a similar palette but different brightness, then sort by exposure to find images with similar brightness but a different palette. Pairing the two lets you triangulate on exactly the mood you're after.

Anchors aren't only for references
Anchors aren't limited to the References tab. You can set a clip in your project as an anchor, or set a clip on the timeline as an anchor — then sort references against it. That cross-referencing between clips, references, and the timeline is the foundation of most working sessions in Colourlab Ai 4. See Anchors (coming soon) for the full workflow.
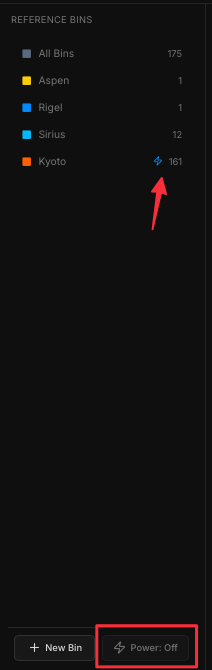
Bins
On the left of the References tab you'll find your bins — think of them as your color bible for a project, the shortlist of looks you're committing to.
To add references to a bin, drag and drop one or more onto it. To create a new bin, click the New Bin option at the bottom of the bin list. Colourlab Ai 4 names new bins automatically, but you can rename any of them whenever you like.
See Bins (coming soon) for the full set of bin operations.

Power bins
Any bin can be converted into a power bin. Select the bin and click the Power button — that bin is now available across every project belonging to the current user, not just the project you created it in. Power bins are how you keep house looks, signature plates, or recurring inspiration accessible everywhere you work.
See Power Bins (coming soon).
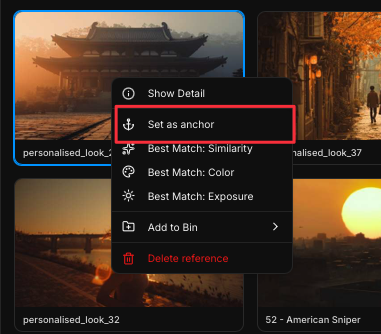
Right-clicking a reference
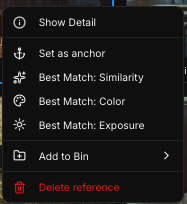
Right-click any reference in the library for these actions:
- Add to Bin — drop the reference into a bin you choose.
- Best match similarity — sets the reference as the anchor and immediately sorts every other reference by similarity to it.
- Best match color — sets it as the anchor and sorts by color.
- Best match exposure — sets it as the anchor and sorts by exposure.
- Reference Detail — opens the PIA Engine readout for that image (see below).
The same right-click menu works on clips, not just references — that's how you set a clip as an anchor and sort references around it.
Reference Detail — the PIA Engine readout
Right-click a reference or a clip and choose Show Detail to open Colourlab Ai 4's analytical view of the image. This is where the PIA Engine — Colourlab's patent-pending perceptual image analyzer — shows you exactly how it sees the picture.
The readout is organised into the following sections.
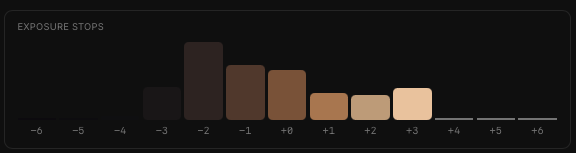
Stops of exposure
A true linear scene-value stop chart. For each stop you see:
- The dominant color in that stop.
- The number of pixels falling into that stop.
IPT analysis
IPT is a perceptually-accurate color space designed to match how human eyes see color. The three channels are:
- I — overall luminance of the image.
- P and T — color channels that correspond to the frequencies of light the eye actually samples.
Statistical values are shown for each channel. These numbers are more useful to the perceptual image-matching engine than they are directly readable to humans — they're the language the engine uses to compare images.

Saturation analysis
- Gamut volume — the percentage of the Rec. 709 gamut the image actually fills.
- Peak saturation — the maximum saturation of a single color in the image.
- Color temperature — the calculated temperature of the image.

Contrast analysis
- Contrast score — a single number between 0 and 100.
- Shadow compression and Highlight compression — describing the S-curve roll-off in shadows and highlights, one of the most characteristic aspects of an image's contrast signature.

Color palette
The dominant colors of the image, calculated perceptually and weighted in proportion to how much of the frame each color actually occupies.

Cinematography analysis
This is the deep, cloud-processed analysis — and it's what the agent uses when you grade by intent. It reads the image for:
- Mood, genre, emotion, intent.
- Lighting direction.
- Texture and tonal qualities.
- Content and location of the shot.
These are the inputs the AI works with when you describe a feeling rather than pick a reference. When you start grading with intent later on, the cinematography palette is what makes the agent's suggestions land.
See PIA Engine (coming soon) for the technical innards.
Importing references
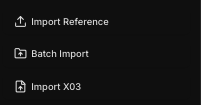
Three ways to bring new references into Colourlab Ai 4:
- Single reference import
- Batch import
- X03 import
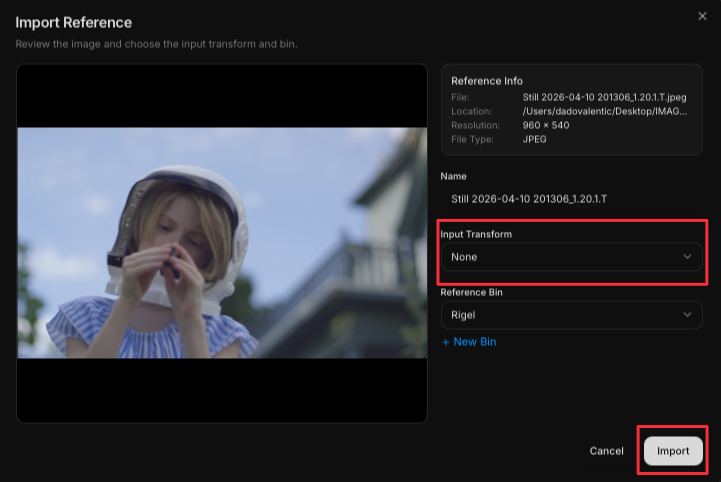
Single reference
- Select the bin you want the reference to land in.
- Click Import Reference.
- In the dialog window, you'll see the source image. If the source is in a log color space, choose the appropriate Input Transform (iNode) to convert it to the working color space. See iNode (coming soon).
- Confirm the destination bin — or create a new bin from inside the dialog.
- Press Import.
Colourlab Ai 4 then runs the deep analysis. Each detailed analysis takes about 8–9 seconds per image and uses 1 credit.
Credit cost reminder. Subscription and Perpetual licenses include 800 credits per month; free trials include 100. You can buy top-up packs of 800 credits for $19, and purchased credits never expire. See Cinematography Analysis Credits.
Batch import
Batch import works exactly the same way, but lets you select a large group of references at once. The analysis runs across the whole batch — one credit per reference.
Batch import also handles X03 files, mixed in with regular images if you need.
X03 files
X03 is Colourlab's proprietary, patented reference file format. An X03 file already contains every layer of analysis the PIA Engine needs — exposure stops, IPT, saturation, contrast, color palette, and cinematography palette — pre-computed and stored alongside the image.
The advantage: X03 files import instantly. No analysis pass, no credits spent. They're available for use the moment they land in your library.